> ## Documentation Index
> Fetch the complete documentation index at: https://docs.cloosphere.ai/llms.txt
> Use this file to discover all available pages before exploring further.
# Files and RAG
> How to attach files, integrate with the Knowledge Base, and review citations
In Cloosphere Chat you can attach files for the AI to analyze, or connect a Knowledge Base for document-grounded answers.
## Attaching Files
You can attach files in several ways.
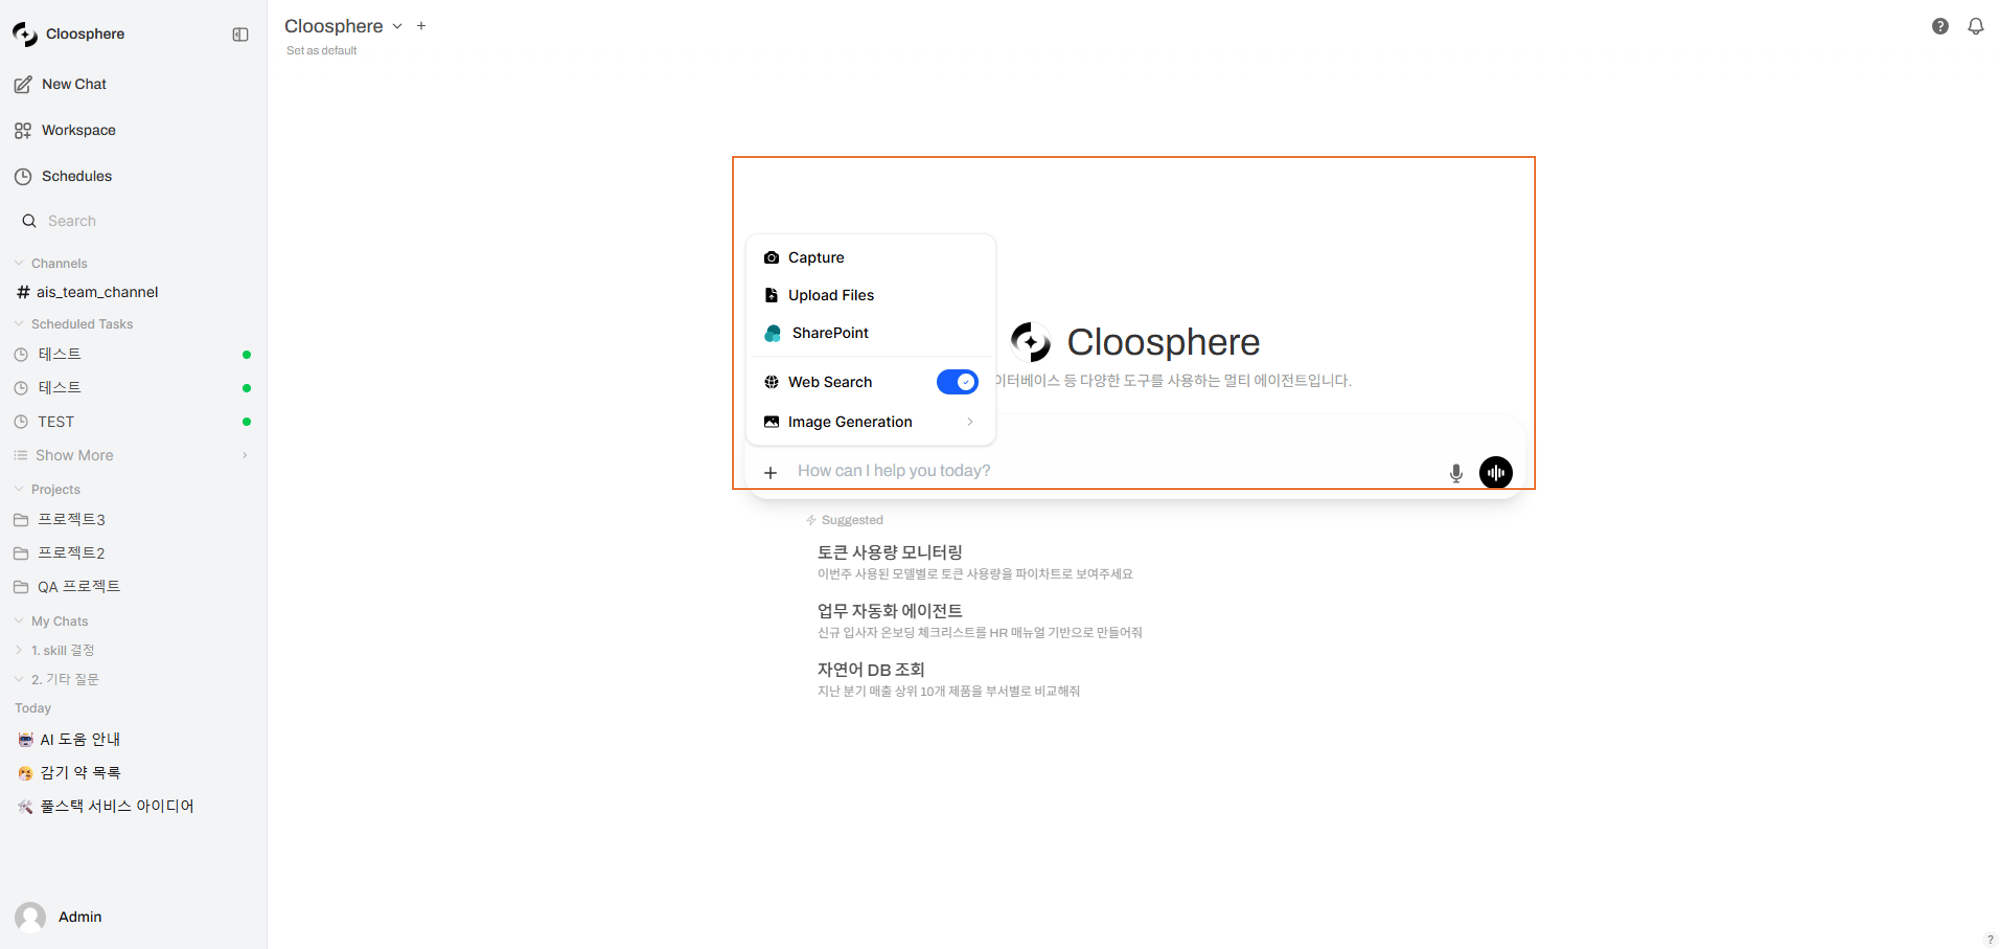 Drag files into the chat area to upload them automatically.
You can drag multiple files at once.
Click the **"+"** button on the left of the input box > **Upload Files** to pick files from the file explorer.
Click the **"+"** button > **Capture** to capture the screen and attach it as an image.
On desktop this works via screen sharing; on mobile it uses the camera.
Copy an image to the clipboard and paste with `Ctrl + V` into the input box.
To auto-convert long pasted text into a file, enable **"Paste Large Text as File"** under **Settings > Interface** (default: off).
When the admin has enabled it, you can pull files directly from these cloud storage services:
* **Google Drive**: Google account integration
* **OneDrive**: Microsoft account integration
* **SharePoint**: Browse your organization's SharePoint sites
## Supported File Formats
| Category | Formats |
| ---------------- | ------------------------------ |
| **Documents** | PDF, DOCX, PPTX, TXT, MD, HTML |
| **Spreadsheets** | XLSX, CSV |
| **Images** | PNG, JPG, GIF, WebP, AVIF |
| **Code** | PY, JS, TS, Java, C++, etc. |
| **Audio** | WAV, MP3, etc. |
| **Data** | JSON, XML, YAML |
When you upload audio (WAV, MP3, etc.), STT (Speech-to-Text) is run automatically to produce a transcription.
## File Size Limits
The maximum file size depends on the value the admin sets in **Settings > Documents**.
Files exceeding the limit are rejected with a "File size should not exceed X MB" error.
## Image Analysis
When you attach an image (PNG, JPG, GIF, WebP, AVIF), a Vision model analyzes its content.
Drag files into the chat area to upload them automatically.
You can drag multiple files at once.
Click the **"+"** button on the left of the input box > **Upload Files** to pick files from the file explorer.
Click the **"+"** button > **Capture** to capture the screen and attach it as an image.
On desktop this works via screen sharing; on mobile it uses the camera.
Copy an image to the clipboard and paste with `Ctrl + V` into the input box.
To auto-convert long pasted text into a file, enable **"Paste Large Text as File"** under **Settings > Interface** (default: off).
When the admin has enabled it, you can pull files directly from these cloud storage services:
* **Google Drive**: Google account integration
* **OneDrive**: Microsoft account integration
* **SharePoint**: Browse your organization's SharePoint sites
## Supported File Formats
| Category | Formats |
| ---------------- | ------------------------------ |
| **Documents** | PDF, DOCX, PPTX, TXT, MD, HTML |
| **Spreadsheets** | XLSX, CSV |
| **Images** | PNG, JPG, GIF, WebP, AVIF |
| **Code** | PY, JS, TS, Java, C++, etc. |
| **Audio** | WAV, MP3, etc. |
| **Data** | JSON, XML, YAML |
When you upload audio (WAV, MP3, etc.), STT (Speech-to-Text) is run automatically to produce a transcription.
## File Size Limits
The maximum file size depends on the value the admin sets in **Settings > Documents**.
Files exceeding the limit are rejected with a "File size should not exceed X MB" error.
## Image Analysis
When you attach an image (PNG, JPG, GIF, WebP, AVIF), a Vision model analyzes its content.
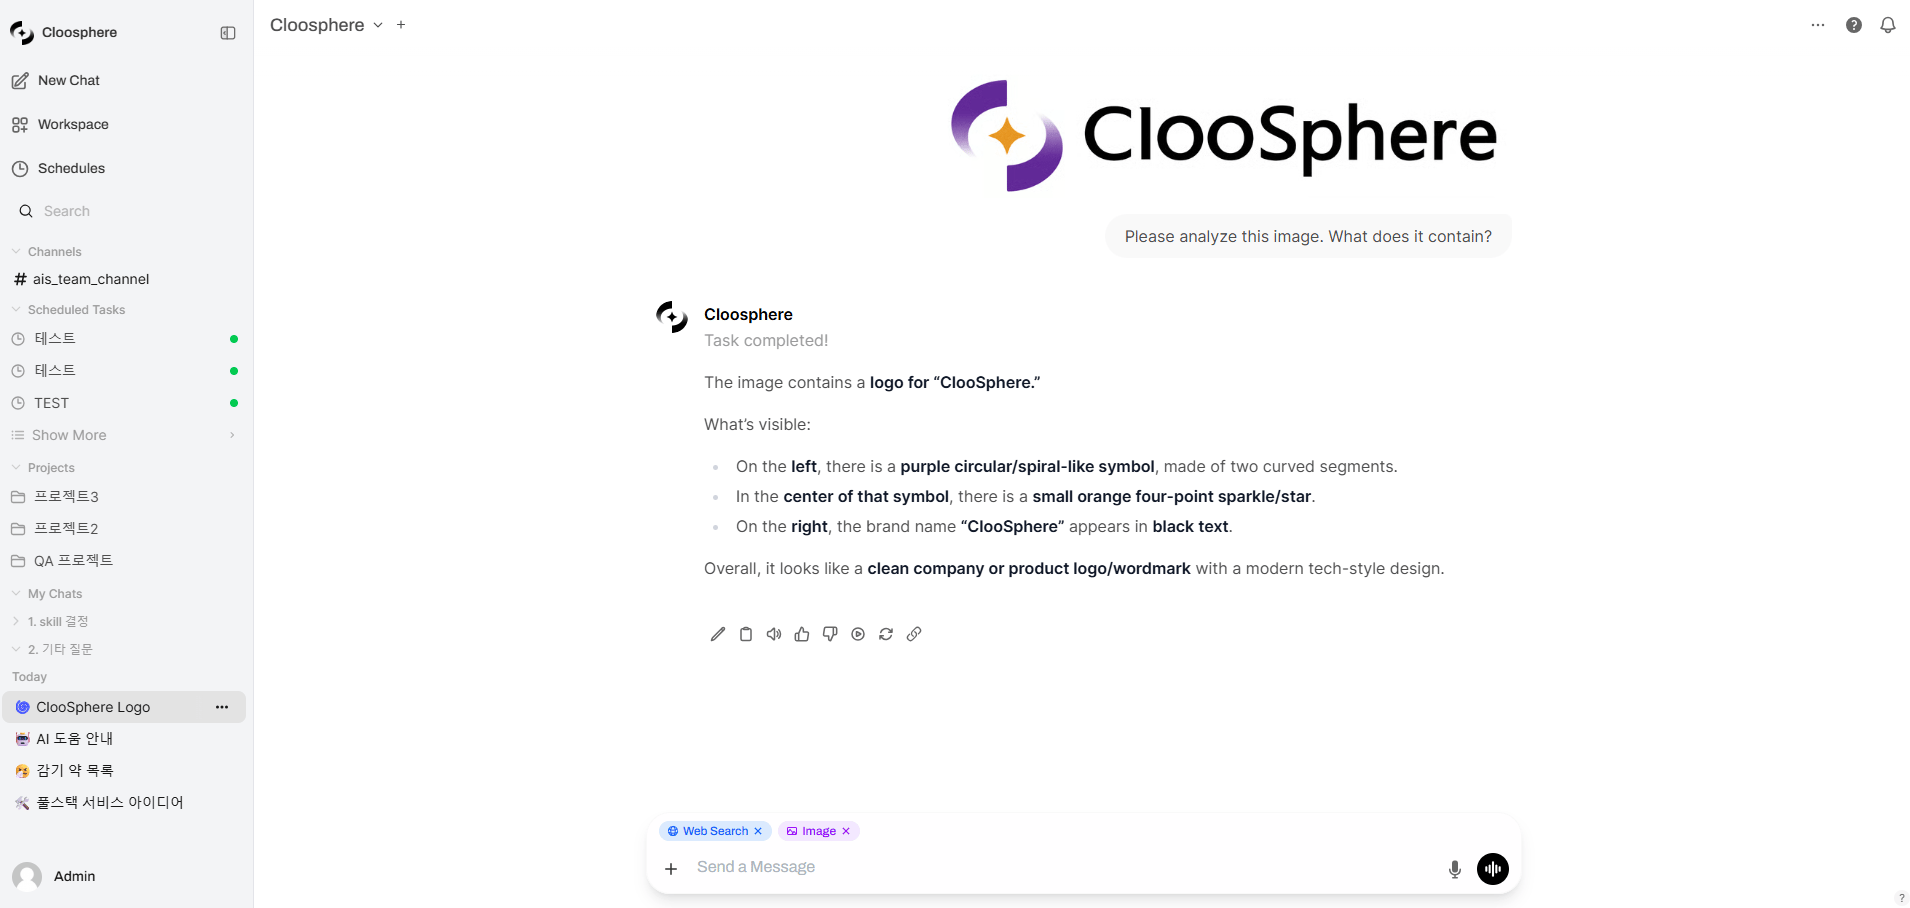 * **Charts/graphs**: Extract and analyze data points
* **Document images**: OCR-based text extraction
* **UI design**: Design feedback and code conversion
* **Error screens**: Analyze error messages and suggest fixes
* **Photos**: Object recognition, scene description
If the selected model doesn't support Vision, attaching an image triggers a "Selected model(s) do not support image inputs" error.
Enable **Settings > Interface > Files > Image Compression** to auto-compress high-resolution images to a target size, improving upload speed and token efficiency.
## Document File Processing
For non-image files (PDF, DOCX, code files, etc.), text is **extracted automatically** at upload time.
Attach a file using one of the methods above. During upload it shows an "uploading" state.
The server extracts the file contents automatically. Once complete, the state changes to "uploaded".
The extracted text is included as context in the AI conversation, enabling questions about the file content.
## Knowledge Base Integration (RAG)
### Reference a Knowledge Base with `#`
Type `#` in the input box to see available Knowledge Base collections and individual files. The AI searches documents from the selected Knowledge Base or file and uses them in its answer.
* **Charts/graphs**: Extract and analyze data points
* **Document images**: OCR-based text extraction
* **UI design**: Design feedback and code conversion
* **Error screens**: Analyze error messages and suggest fixes
* **Photos**: Object recognition, scene description
If the selected model doesn't support Vision, attaching an image triggers a "Selected model(s) do not support image inputs" error.
Enable **Settings > Interface > Files > Image Compression** to auto-compress high-resolution images to a target size, improving upload speed and token efficiency.
## Document File Processing
For non-image files (PDF, DOCX, code files, etc.), text is **extracted automatically** at upload time.
Attach a file using one of the methods above. During upload it shows an "uploading" state.
The server extracts the file contents automatically. Once complete, the state changes to "uploaded".
The extracted text is included as context in the AI conversation, enabling questions about the file content.
## Knowledge Base Integration (RAG)
### Reference a Knowledge Base with `#`
Type `#` in the input box to see available Knowledge Base collections and individual files. The AI searches documents from the selected Knowledge Base or file and uses them in its answer.
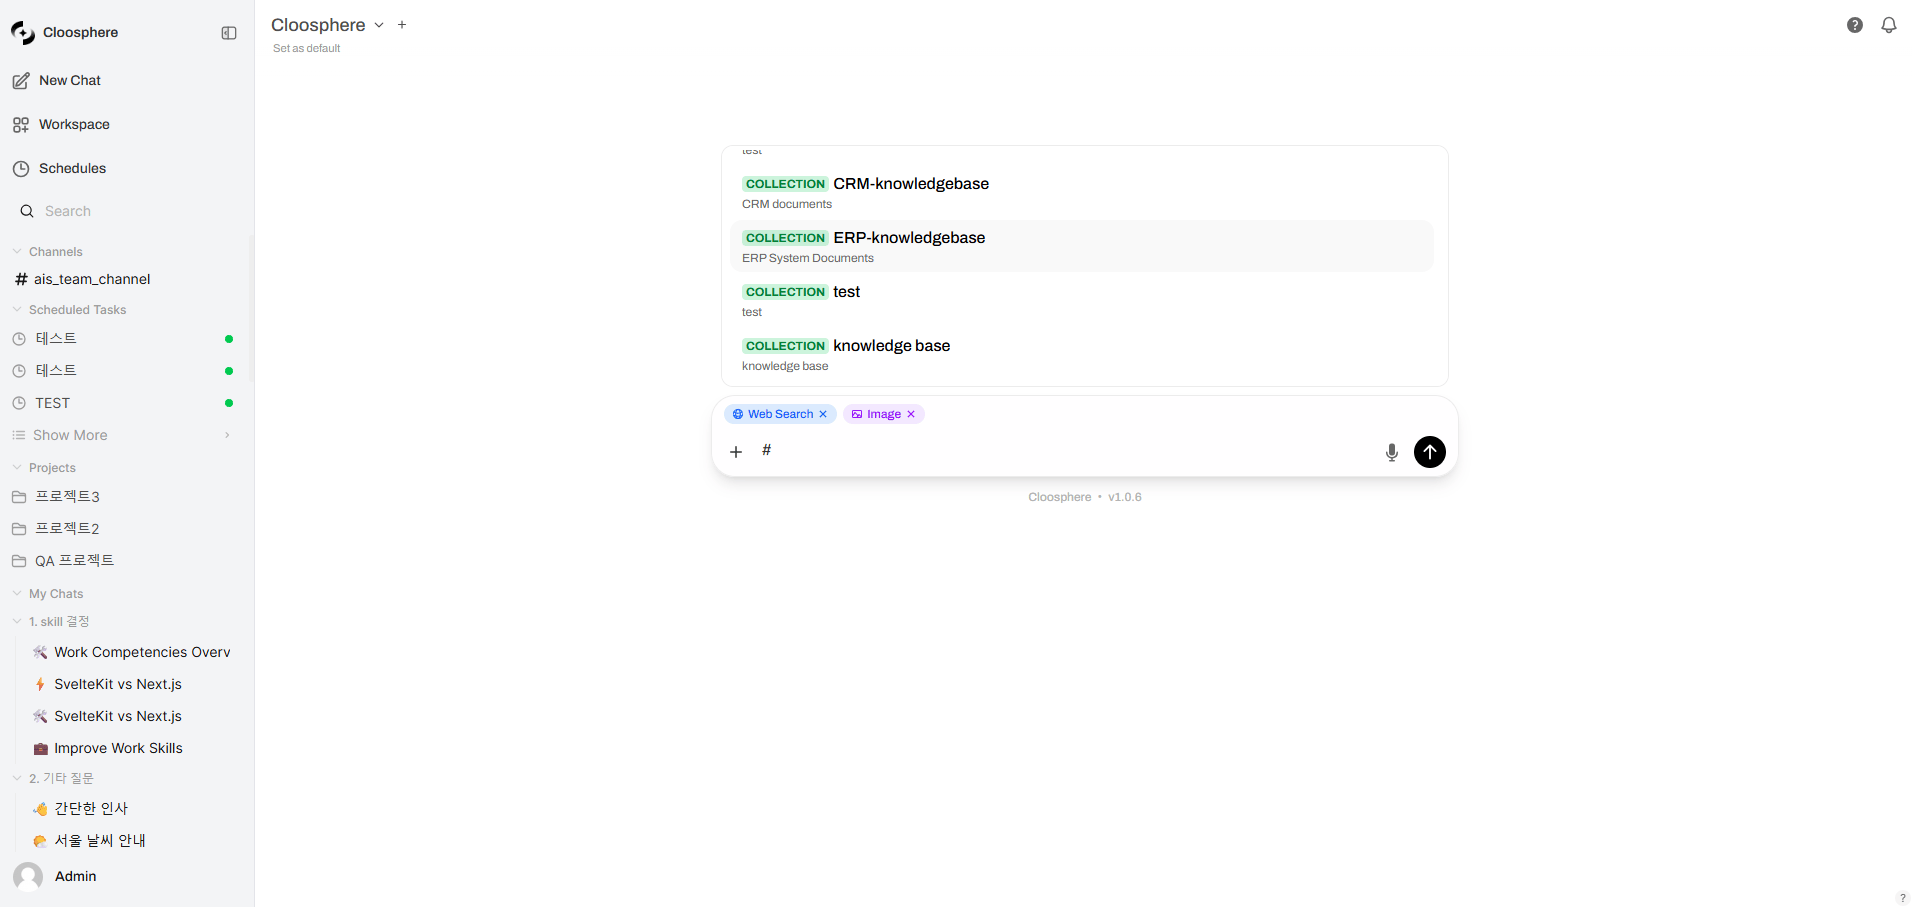 ```
#hr-policy What is the leave application process?
```
### How RAG Works
```mermaid theme={null}
flowchart LR
A[User question] --> B[Query generation]
B --> C[Vector search]
C --> D[Retrieve relevant chunks]
D --> E[Insert into context]
E --> F[LLM response generation]
F --> G[Response with citations]
```
A search query is generated from the user's question.
Vector similarity search runs against document chunks stored in the Knowledge Base.
The retrieved relevant chunks are inserted into the AI prompt as context.
The AI generates an answer that references the retrieved documents and provides citations.
### Agent-based RAG
When an agent has Knowledge Bases attached, it searches them automatically — no `#` command required.
Attach Knowledge Bases in Workspace > Agent settings.
## Citation Display
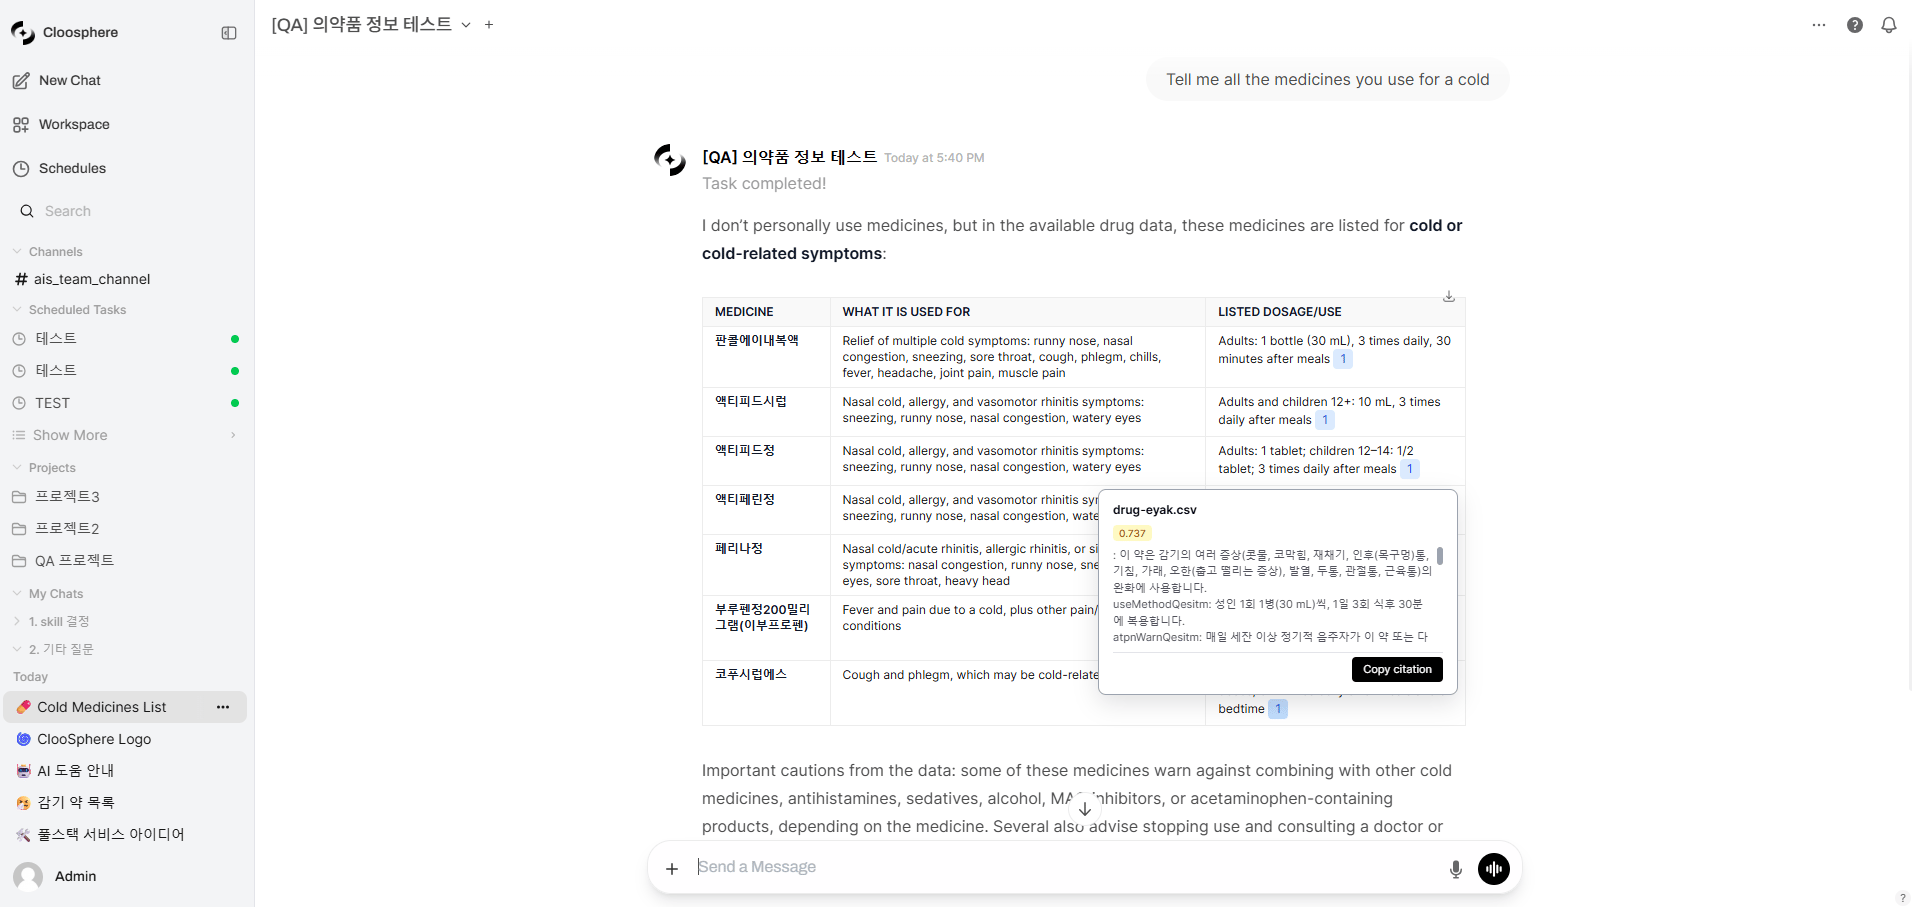
Responses that referenced Knowledge Base or web search results show **citations**.
```
#hr-policy What is the leave application process?
```
### How RAG Works
```mermaid theme={null}
flowchart LR
A[User question] --> B[Query generation]
B --> C[Vector search]
C --> D[Retrieve relevant chunks]
D --> E[Insert into context]
E --> F[LLM response generation]
F --> G[Response with citations]
```
A search query is generated from the user's question.
Vector similarity search runs against document chunks stored in the Knowledge Base.
The retrieved relevant chunks are inserted into the AI prompt as context.
The AI generates an answer that references the retrieved documents and provides citations.
### Agent-based RAG
When an agent has Knowledge Bases attached, it searches them automatically — no `#` command required.
Attach Knowledge Bases in Workspace > Agent settings.
## Citation Display
Responses that referenced Knowledge Base or web search results show **citations**.
 ### Citation List
A list of referenced documents appears below the response.
| Item | Description |
| ----------------------- | ----------------------------------------------------------------------------- |
| **Index number** | The citation order number |
| **Source name** | Original filename or URL |
| **Source count toggle** | Shows the total source count in "N Sources" format — click to expand the list |
Relevance (similarity score) is not shown in the citation list — view it inside the **source modal** opened by clicking a citation.
### Reviewing the Source
Click a citation to open the **source modal** with the full retrieved chunk content.
Click a source item in the citation area below the response.
The modal shows the retrieved chunk's full text and metadata.
Use the source to directly verify the accuracy of the AI response.
URL-based sources (web search results) take you directly to the original page when clicked.
## Files in Chat Controls
The **Files** section of the Chat Controls panel lists files attached to the current conversation.
* Each item shows filename, type, and size
* Remove individual files with the **X button** on the right of each item
* Clicking a file shows its details
### Citation List
A list of referenced documents appears below the response.
| Item | Description |
| ----------------------- | ----------------------------------------------------------------------------- |
| **Index number** | The citation order number |
| **Source name** | Original filename or URL |
| **Source count toggle** | Shows the total source count in "N Sources" format — click to expand the list |
Relevance (similarity score) is not shown in the citation list — view it inside the **source modal** opened by clicking a citation.
### Reviewing the Source
Click a citation to open the **source modal** with the full retrieved chunk content.
Click a source item in the citation area below the response.
The modal shows the retrieved chunk's full text and metadata.
Use the source to directly verify the accuracy of the AI response.
URL-based sources (web search results) take you directly to the original page when clicked.
## Files in Chat Controls
The **Files** section of the Chat Controls panel lists files attached to the current conversation.
* Each item shows filename, type, and size
* Remove individual files with the **X button** on the right of each item
* Clicking a file shows its details