> ## Documentation Index
> Fetch the complete documentation index at: https://docs.cloosphere.ai/llms.txt
> Use this file to discover all available pages before exploring further.
# Tools
> Connect external APIs and MCP servers to AI for real-time data lookup and task automation
Tool integration lets the AI invoke external system functions (Function Calling).
Connect a REST API based on an OpenAPI spec or an MCP (Model Context Protocol) server, and the AI automatically calls tools at the right moment during a conversation.
```mermaid theme={null}
flowchart LR
A[User question] --> B[AI analysis]
B --> C{Tool needed?}
C -->|No| D[Direct response]
C -->|Yes| E[Extract parameters]
E --> F[API call]
F --> G[Return result]
G --> H[AI interpretation]
H --> I[Natural language response]
```
***
## What is a Tool?
A tool is an interface that extends the AI's capabilities to external systems. The AI can fetch real-time information beyond its training data or trigger actions on external systems.
### Use Cases
| Connect to | What's Possible |
| ---------------------- | --------------------------------------------------- |
| **CRM system** | Look up customer info, register sales opportunities |
| **Ticket system** | Create issues, update status |
| **HR system** | Submit leave requests, look up employee info |
| **Weather/stock APIs** | Provide real-time external data |
| **Internal data APIs** | Look up business data like sales, inventory |
### Supported Protocols
Standard REST API spec (formerly Swagger). The general-purpose protocol most web services provide.
Model Context Protocol. AI-dedicated tool server protocol with safer and more efficient integration.
***
## Tool List
In **Workspace > Tools**, view all registered tool integrations.
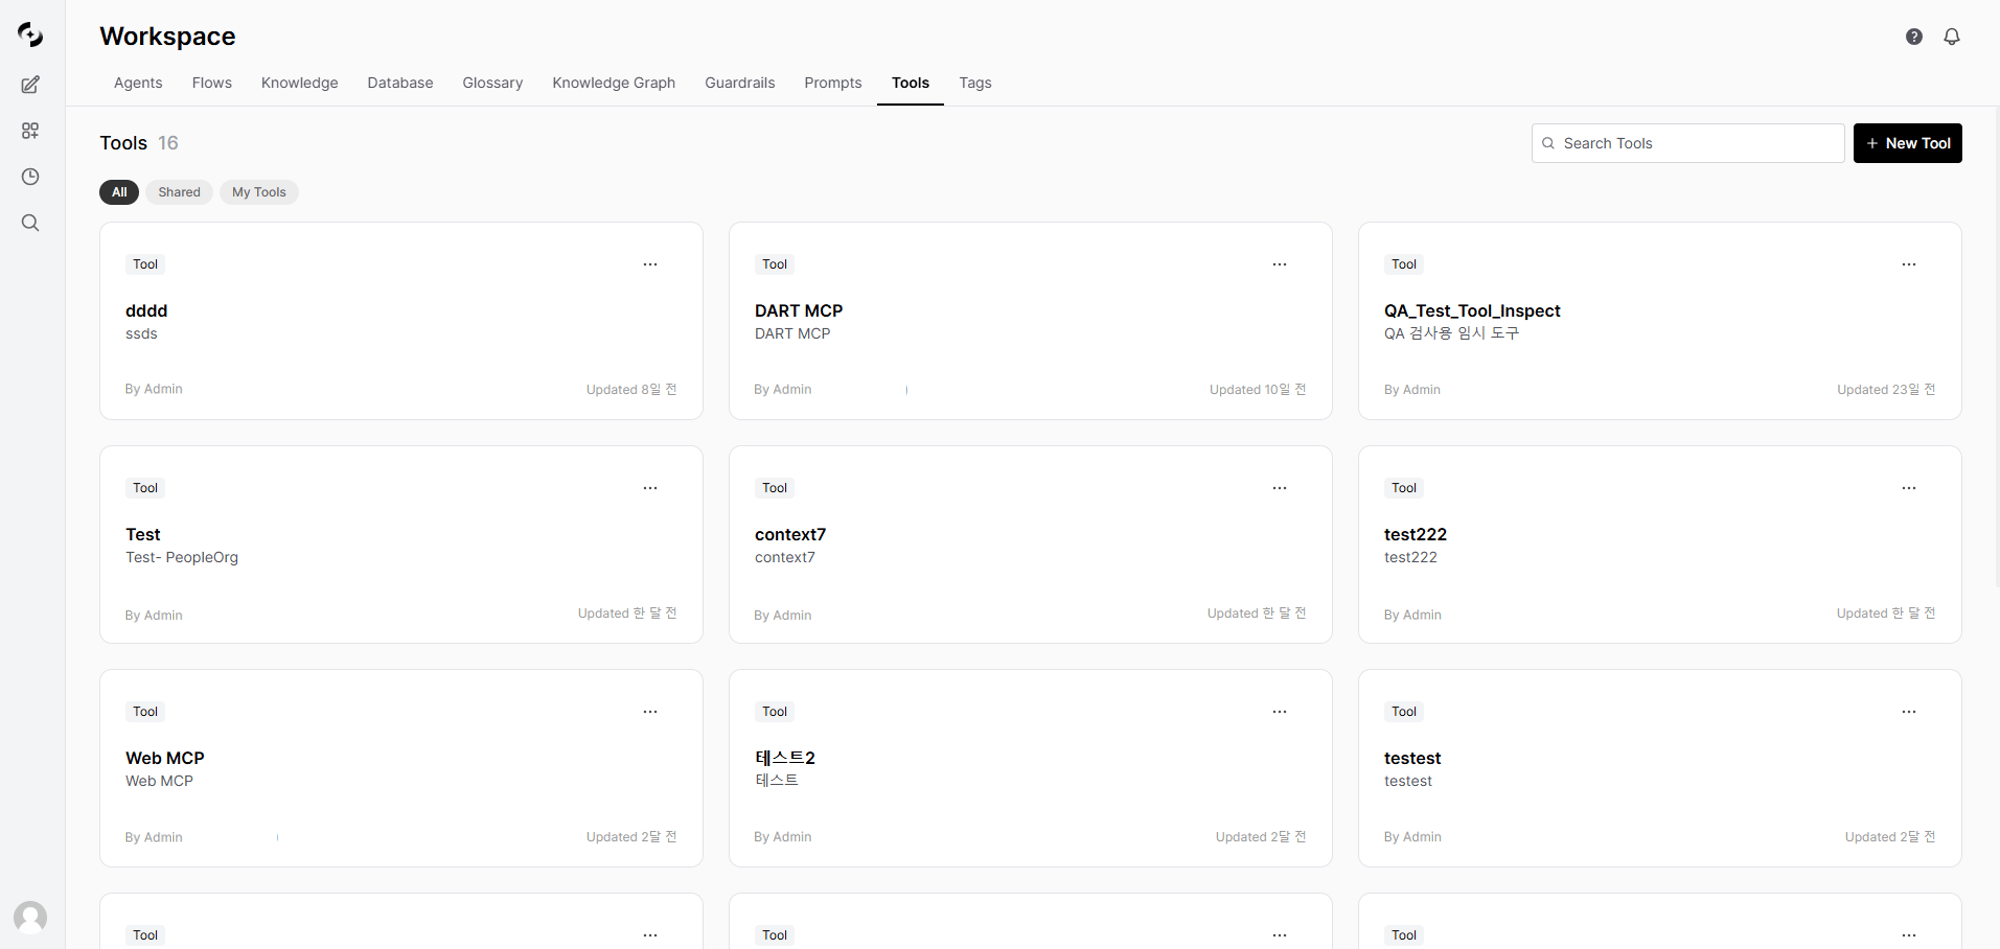 Each tool in the list shows:
| Item | Description |
| --------------- | ----------------------------- |
| **Name** | Tool display name |
| **Description** | Tool purpose |
| **Author** | User who created the tool |
| **Modified** | Last modified time (relative) |
There's a search box at the top of the list to find tools by name or description.
The menu (`...`) on each tool card lets you **delete**.
***
## Creating a Tool
Tool creation has two steps: enter basic info (CreateTool), then configure the connection on the detail page (ToolDetail).
Click the **+ New Tool** button at the top-right of the **Workspace > Tools** list.
Fill in the create form.
Each tool in the list shows:
| Item | Description |
| --------------- | ----------------------------- |
| **Name** | Tool display name |
| **Description** | Tool purpose |
| **Author** | User who created the tool |
| **Modified** | Last modified time (relative) |
There's a search box at the top of the list to find tools by name or description.
The menu (`...`) on each tool card lets you **delete**.
***
## Creating a Tool
Tool creation has two steps: enter basic info (CreateTool), then configure the connection on the detail page (ToolDetail).
Click the **+ New Tool** button at the top-right of the **Workspace > Tools** list.
Fill in the create form.
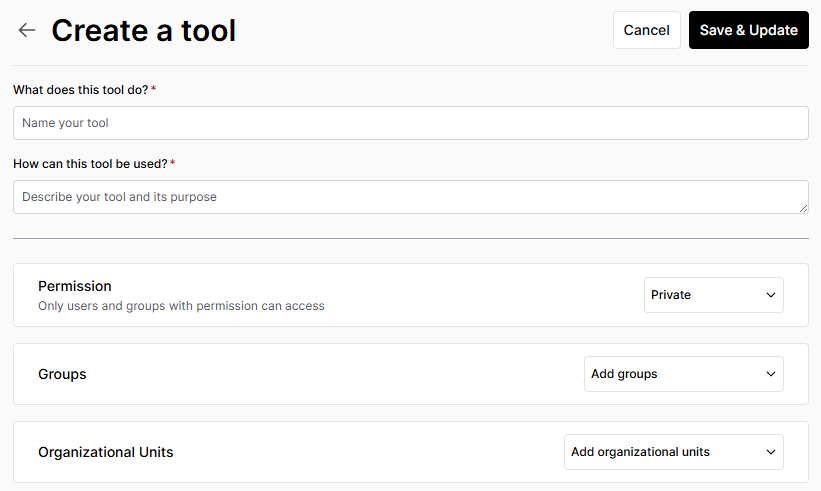 | Field Label | Description | Example |
| -------------------------------------------- | ---------------------------------------------- | ---------------------------------------------------- |
| **What does this tool do?** (name) | Tool display name | "Customer Management API" |
| **How can this tool be used?** (description) | Tool purpose | "Look up and manage customer info in the CRM system" |
| **Access** | Public, or restricted to specific groups/users | Public, or specified groups/users |
Access is split into Public and Private (specific groups/users). For Private, you can refine Read and Write permissions per group/user.
Clicking **Save & Update** creates the tool and auto-redirects to the detail settings page.
Set up the actual connection on the auto-loaded detail page (`/workspace/tools/{id}`).
See the [OpenAPI Tool Connection](#openapi-tool-connection) and [MCP Tool Connection](#mcp-tool-connection) sections below for the detail page configuration.
***
## OpenAPI Tool Connection
How to connect a REST API that provides an OpenAPI (formerly Swagger) spec.
Configure the following on the tool detail page.
| Field Label | Description | Example |
| -------------------------------------------- | ---------------------------------------------- | ---------------------------------------------------- |
| **What does this tool do?** (name) | Tool display name | "Customer Management API" |
| **How can this tool be used?** (description) | Tool purpose | "Look up and manage customer info in the CRM system" |
| **Access** | Public, or restricted to specific groups/users | Public, or specified groups/users |
Access is split into Public and Private (specific groups/users). For Private, you can refine Read and Write permissions per group/user.
Clicking **Save & Update** creates the tool and auto-redirects to the detail settings page.
Set up the actual connection on the auto-loaded detail page (`/workspace/tools/{id}`).
See the [OpenAPI Tool Connection](#openapi-tool-connection) and [MCP Tool Connection](#mcp-tool-connection) sections below for the detail page configuration.
***
## OpenAPI Tool Connection
How to connect a REST API that provides an OpenAPI (formerly Swagger) spec.
Configure the following on the tool detail page.
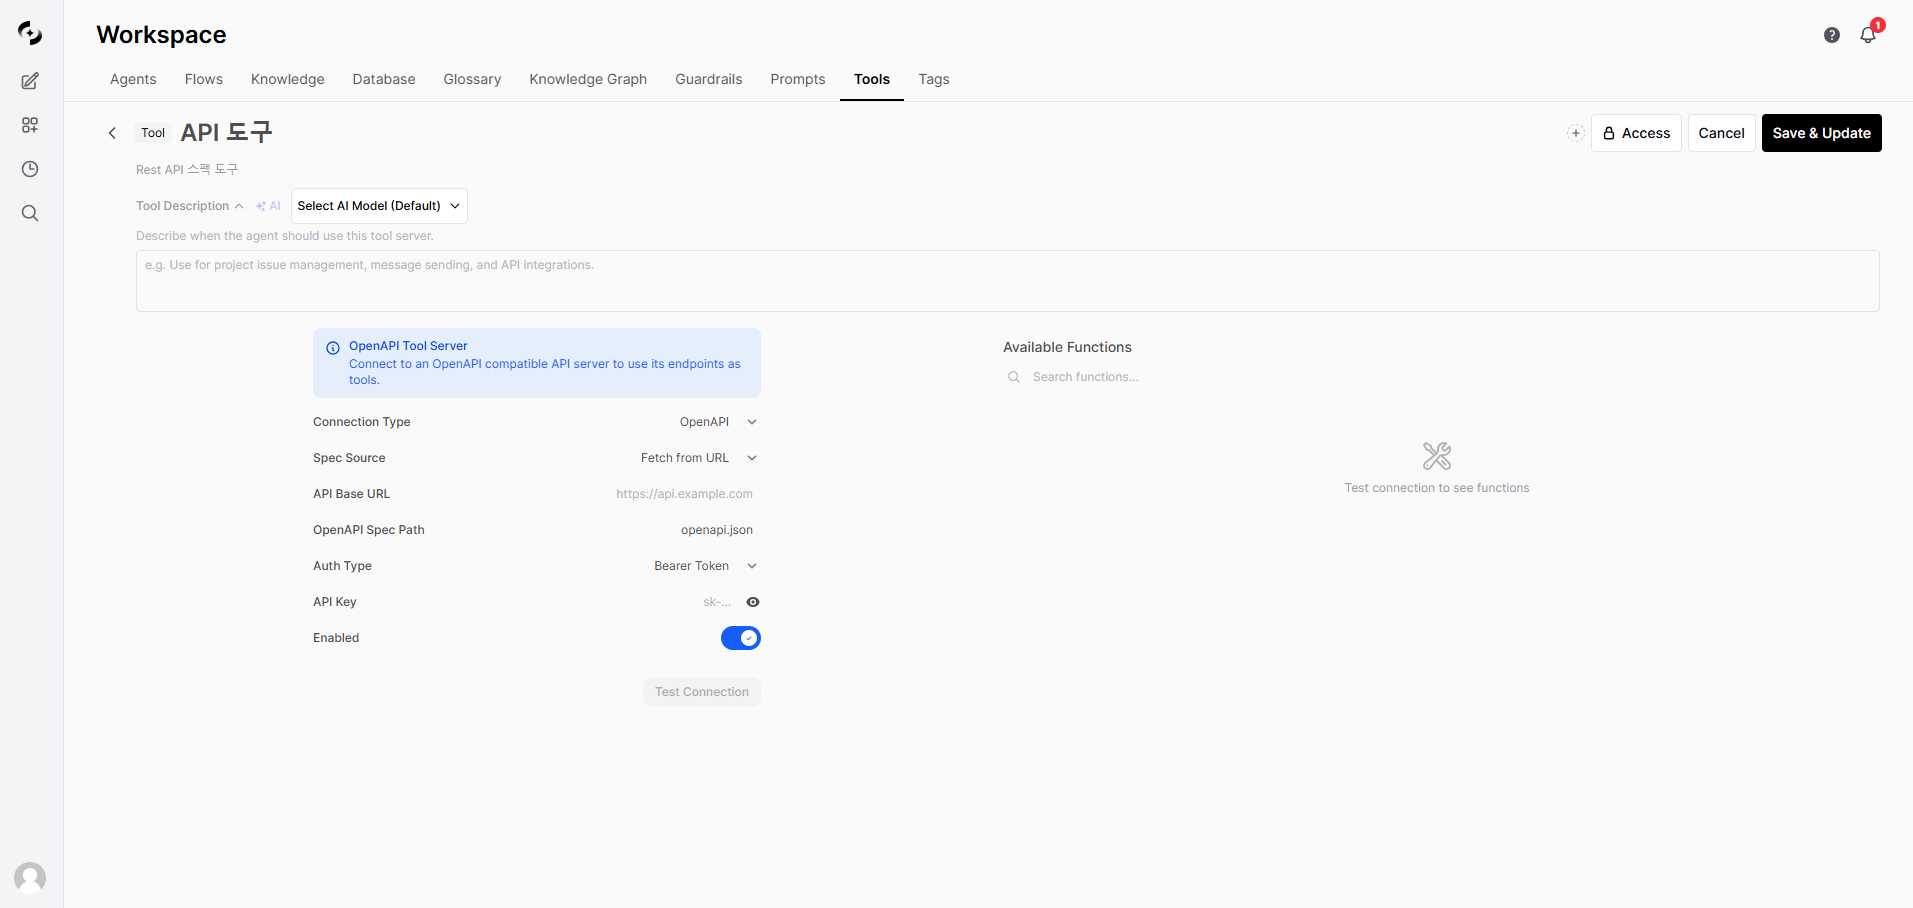 ### Connection Settings
| Field | Description | Default |
| --------------------- | -------------------------------------- | -------------- |
| **Connection Type** | OpenAPI or MCP dropdown | OpenAPI |
| **Spec Source** | Fetch from URL, or direct input/upload | Fetch from URL |
| **API Base URL** | OpenAPI server's base URL | — |
| **OpenAPI Spec Path** | Path to the OpenAPI spec file | `openapi.json` |
| **Auth Type** | Authentication method | Bearer Token |
| **API Key** | Token value when using Bearer Token | — |
| **Enabled** | Toggle connection enable/disable | Enabled |
Enter the Bearer token in the API Key field. It's sent as the `Authorization: Bearer ` header on API calls.
```
API Base URL: https://api.example.com
OpenAPI Spec Path: openapi.json
Auth Type: Bearer Token
API Key: sk-xxxxxxxxxxxxxxxx
```
Uses the current signed-in user's session credentials directly. No separate API key entry needed.
Suitable when an internal API server uses the same auth scheme as Cloosphere.
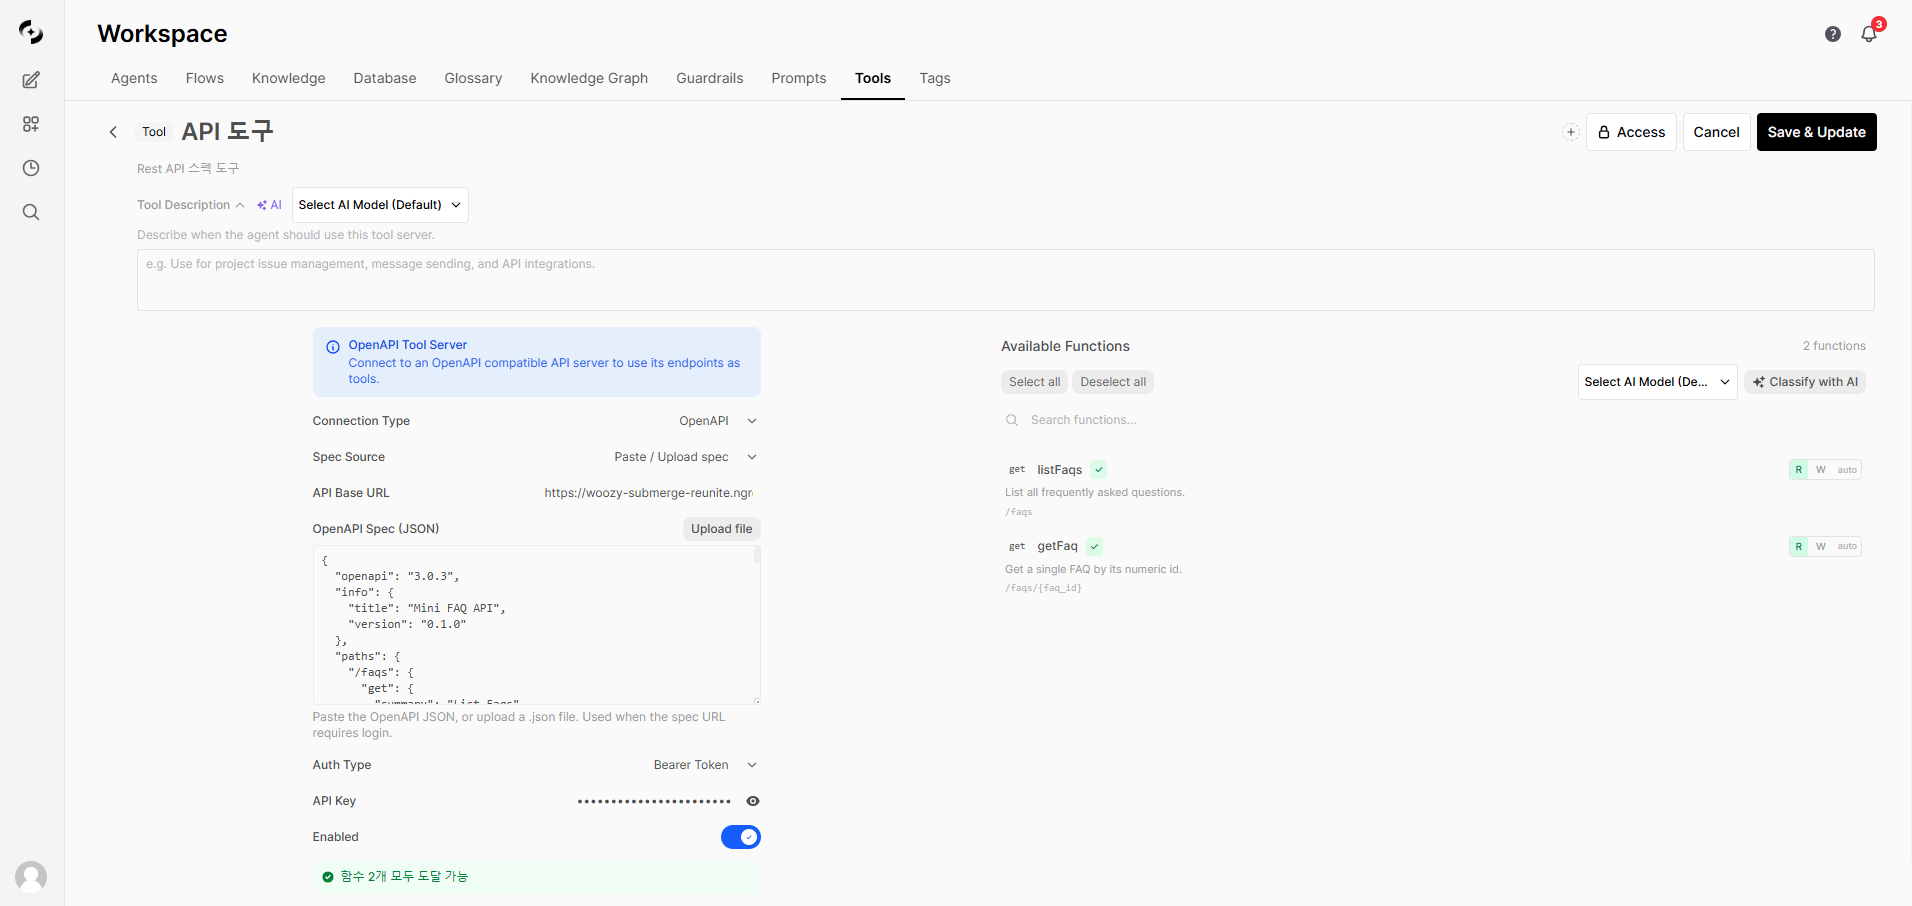
### Test Connection and Verify Functions
After configuration, click the **Test Connection** button.
When the connection succeeds, the **Available Functions** panel on the right auto-displays the API endpoint list.
Each function shows HTTP method (GET, POST, etc.), name, description, and path. Hover to see parameter details.
### Connection Settings
| Field | Description | Default |
| --------------------- | -------------------------------------- | -------------- |
| **Connection Type** | OpenAPI or MCP dropdown | OpenAPI |
| **Spec Source** | Fetch from URL, or direct input/upload | Fetch from URL |
| **API Base URL** | OpenAPI server's base URL | — |
| **OpenAPI Spec Path** | Path to the OpenAPI spec file | `openapi.json` |
| **Auth Type** | Authentication method | Bearer Token |
| **API Key** | Token value when using Bearer Token | — |
| **Enabled** | Toggle connection enable/disable | Enabled |
Enter the Bearer token in the API Key field. It's sent as the `Authorization: Bearer ` header on API calls.
```
API Base URL: https://api.example.com
OpenAPI Spec Path: openapi.json
Auth Type: Bearer Token
API Key: sk-xxxxxxxxxxxxxxxx
```
Uses the current signed-in user's session credentials directly. No separate API key entry needed.
Suitable when an internal API server uses the same auth scheme as Cloosphere.
### Test Connection and Verify Functions
After configuration, click the **Test Connection** button.
When the connection succeeds, the **Available Functions** panel on the right auto-displays the API endpoint list.
Each function shows HTTP method (GET, POST, etc.), name, description, and path. Hover to see parameter details.
 ***
## MCP Tool Connection
MCP (Model Context Protocol) is a dedicated protocol for communication between AI models and external tools.
On the tool detail page, change **Connection Type** to **MCP** and configure the following.
***
## MCP Tool Connection
MCP (Model Context Protocol) is a dedicated protocol for communication between AI models and external tools.
On the tool detail page, change **Connection Type** to **MCP** and configure the following.
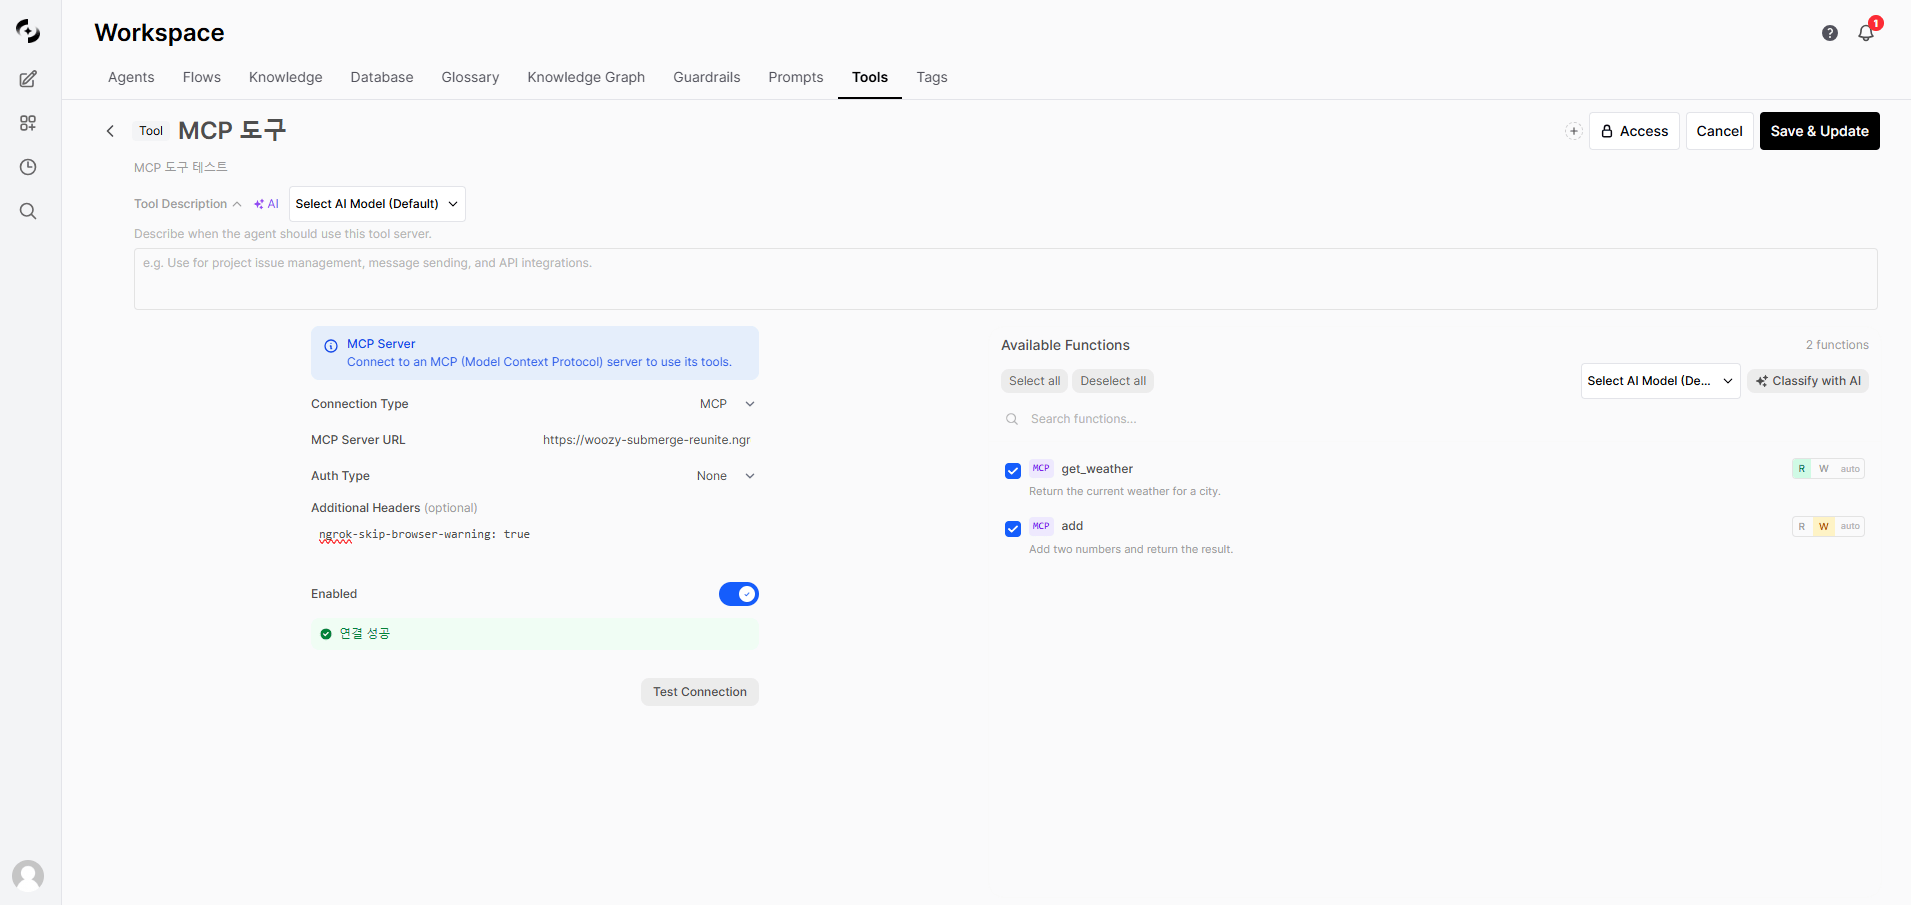 ### Connection Settings
| Field | Description | Default |
| ---------------------- | ------------------------------------------------------- | ------- |
| **Connection Type** | Select MCP | — |
| **MCP Server URL** | MCP server URL (SSE endpoint) | — |
| **Auth Type** | Auth method (None / Bearer Token / API Key / OAuth 2.0) | None |
| **Additional Headers** | Extra HTTP headers (optional) | — |
| **Enabled** | Toggle connection enable/disable | Enabled |
### MCP Authentication Methods
Connect to the MCP server without auth. Suitable for local or internal-network MCP servers.
Auth using a Bearer token. The token is sent as the `Authorization: Bearer ` header on requests.
Auth using an API key. The key is sent in an auth header per the server's requirements.
Auth using the signed-in user's own SSO token. No key entry is needed — based on the selected **provider (Microsoft / Google)**, each request automatically injects that user's OAuth access token.
Suitable for MCP servers that require per-user permissions, such as Google Workspace or Microsoft 365.
### Additional Headers
If the MCP server requires custom headers, enter them in the **Additional Headers** field. One per line in `key: value` form.
```
X-Custom-Header: value
X-Another-Header: another-value
```
### Test Connection
Click **Test Connection** to connect to the MCP server and fetch the list of provided tools.
On success, the MCP tool list is shown in the **Available Functions** panel on the right.
***
## Tool Description (for the agent)
The **Tool Description** field at the top of the tool detail page is used by the agent to decide when to use this tool server.
* Write the description directly, or click the **AI** button to auto-generate based on the connected function list
* For AI generation, choose the model from the dropdown (default: system default model)
* AI generation is only possible after Test Connection has loaded the function list
A well-written Tool Description improves the agent's accuracy in choosing the right tool at the right time.
Example: "Use when project issue management, message sending, or API integration is needed."
***
## Using Tools
### Connect a Tool to an Agent
When you connect a tool to an agent, the AI auto-invokes it at appropriate moments during a conversation.
1. In **Workspace > Agents**, open the agent edit screen
2. Pick the tool to connect in the **Tools** section
3. Save
### Tool Invocation in Chat
The AI analyzes the user's question, decides if a tool is needed, and calls it automatically when so.
```
User: Look up customer ID 12345
AI: [Calling CRM API...]
Customer info retrieved:
| Item | Value |
|------|-------|
| Name | John Doe |
| Email | hong@example.com |
| Tier | VIP |
| Last purchase | 2024-01-15 |
```
***
## Tool Management
### Edit
Click a card in the tool list to go to the detail page where you can edit connection settings, name, description, Tool Description, and more.
Save changes with the **Save & Update** button at the top-right of the detail page.
### Delete
In the tool list, click the menu (`...`) on the right of a card and select **Delete**.
Confirm in the deletion dialog and the tool is permanently deleted.
### Change Access
Click the **Access** button at the top-right of the detail page to change access permissions.
Specify Read and Write permissions per group/user, or set to Public.
***
## Security Considerations
| Security Feature | Description |
| --------------------------- | --------------------------------------------- |
| **Encrypted communication** | All API calls are TLS-encrypted |
| **Credential storage** | API keys are stored as JSON in the database |
| **Access control** | Restrict tool usage by Read/Write permissions |
API keys are stored as plain text — rotate them regularly.
Connect only APIs within private networks, and use IP allowlisting or VPN/Private Endpoint when needed.
Restrict database access appropriately to protect credentials.
***
## Troubleshooting
| Cause | Solution |
| ------------ | -------------------------------------------- |
| URL error | Re-verify API Base URL and OpenAPI Spec Path |
| Auth failure | Check API key/token validity |
| Network | Check firewall/proxy settings |
| CORS | Check server-side CORS settings |
| Cause | Solution |
| ------------------------ | ----------------------------- |
| Insufficient permissions | Check API permissions (scope) |
| Rate Limit | Throttle call frequency |
| Server error | Check external service status |
| Cause | Solution |
| -------------------- | ----------------------------------------------------------------------------- |
| URL format | Check SSE endpoint URL format (e.g., `https://mcp.example.com/sse`) |
| Auth method mismatch | Confirm config matches the server's required auth (None/Bearer Token/API Key) |
| Connection disabled | Verify the Enabled toggle is on |
***
## FAQ
Any API providing an OpenAPI (Swagger) spec can be connected.
Without a spec, build your own MCP server or write the OpenAPI spec separately.
The external service's pricing applies when using its API.
Cloosphere itself charges no extra cost for tool calls.
All communication is TLS-encrypted, and access can be finely controlled to limit usage.
Combined with guardrails, you can further prevent sensitive info leaks.
If you already have a REST API providing an OpenAPI spec, choose OpenAPI.
If you're building a new AI-dedicated tool server or already have an MCP-compatible server, choose MCP.
***
## Next Steps
Extend AI capabilities by connecting tools to agents
Step-by-step tracking of tool invocation
### Connection Settings
| Field | Description | Default |
| ---------------------- | ------------------------------------------------------- | ------- |
| **Connection Type** | Select MCP | — |
| **MCP Server URL** | MCP server URL (SSE endpoint) | — |
| **Auth Type** | Auth method (None / Bearer Token / API Key / OAuth 2.0) | None |
| **Additional Headers** | Extra HTTP headers (optional) | — |
| **Enabled** | Toggle connection enable/disable | Enabled |
### MCP Authentication Methods
Connect to the MCP server without auth. Suitable for local or internal-network MCP servers.
Auth using a Bearer token. The token is sent as the `Authorization: Bearer ` header on requests.
Auth using an API key. The key is sent in an auth header per the server's requirements.
Auth using the signed-in user's own SSO token. No key entry is needed — based on the selected **provider (Microsoft / Google)**, each request automatically injects that user's OAuth access token.
Suitable for MCP servers that require per-user permissions, such as Google Workspace or Microsoft 365.
### Additional Headers
If the MCP server requires custom headers, enter them in the **Additional Headers** field. One per line in `key: value` form.
```
X-Custom-Header: value
X-Another-Header: another-value
```
### Test Connection
Click **Test Connection** to connect to the MCP server and fetch the list of provided tools.
On success, the MCP tool list is shown in the **Available Functions** panel on the right.
***
## Tool Description (for the agent)
The **Tool Description** field at the top of the tool detail page is used by the agent to decide when to use this tool server.
* Write the description directly, or click the **AI** button to auto-generate based on the connected function list
* For AI generation, choose the model from the dropdown (default: system default model)
* AI generation is only possible after Test Connection has loaded the function list
A well-written Tool Description improves the agent's accuracy in choosing the right tool at the right time.
Example: "Use when project issue management, message sending, or API integration is needed."
***
## Using Tools
### Connect a Tool to an Agent
When you connect a tool to an agent, the AI auto-invokes it at appropriate moments during a conversation.
1. In **Workspace > Agents**, open the agent edit screen
2. Pick the tool to connect in the **Tools** section
3. Save
### Tool Invocation in Chat
The AI analyzes the user's question, decides if a tool is needed, and calls it automatically when so.
```
User: Look up customer ID 12345
AI: [Calling CRM API...]
Customer info retrieved:
| Item | Value |
|------|-------|
| Name | John Doe |
| Email | hong@example.com |
| Tier | VIP |
| Last purchase | 2024-01-15 |
```
***
## Tool Management
### Edit
Click a card in the tool list to go to the detail page where you can edit connection settings, name, description, Tool Description, and more.
Save changes with the **Save & Update** button at the top-right of the detail page.
### Delete
In the tool list, click the menu (`...`) on the right of a card and select **Delete**.
Confirm in the deletion dialog and the tool is permanently deleted.
### Change Access
Click the **Access** button at the top-right of the detail page to change access permissions.
Specify Read and Write permissions per group/user, or set to Public.
***
## Security Considerations
| Security Feature | Description |
| --------------------------- | --------------------------------------------- |
| **Encrypted communication** | All API calls are TLS-encrypted |
| **Credential storage** | API keys are stored as JSON in the database |
| **Access control** | Restrict tool usage by Read/Write permissions |
API keys are stored as plain text — rotate them regularly.
Connect only APIs within private networks, and use IP allowlisting or VPN/Private Endpoint when needed.
Restrict database access appropriately to protect credentials.
***
## Troubleshooting
| Cause | Solution |
| ------------ | -------------------------------------------- |
| URL error | Re-verify API Base URL and OpenAPI Spec Path |
| Auth failure | Check API key/token validity |
| Network | Check firewall/proxy settings |
| CORS | Check server-side CORS settings |
| Cause | Solution |
| ------------------------ | ----------------------------- |
| Insufficient permissions | Check API permissions (scope) |
| Rate Limit | Throttle call frequency |
| Server error | Check external service status |
| Cause | Solution |
| -------------------- | ----------------------------------------------------------------------------- |
| URL format | Check SSE endpoint URL format (e.g., `https://mcp.example.com/sse`) |
| Auth method mismatch | Confirm config matches the server's required auth (None/Bearer Token/API Key) |
| Connection disabled | Verify the Enabled toggle is on |
***
## FAQ
Any API providing an OpenAPI (Swagger) spec can be connected.
Without a spec, build your own MCP server or write the OpenAPI spec separately.
The external service's pricing applies when using its API.
Cloosphere itself charges no extra cost for tool calls.
All communication is TLS-encrypted, and access can be finely controlled to limit usage.
Combined with guardrails, you can further prevent sensitive info leaks.
If you already have a REST API providing an OpenAPI spec, choose OpenAPI.
If you're building a new AI-dedicated tool server or already have an MCP-compatible server, choose MCP.
***
## Next Steps
Extend AI capabilities by connecting tools to agents
Step-by-step tracking of tool invocation